A step-by-step, DIY-friendly guide to planning, framing, and finishing a sturdy floating deck fast, including span guidance, support layouts, tool lists, and...
home improvement and DIY
Build a DIY Smokeless Fire Pit

Marcus Hayes
Marcus Hayes is a lifelong DIY enthusiast and former residential carpenter who has spent the last decade renovating his 1970s fixer-upper. Through Tinksmith, he shares his hands-on experience to help fellow homeowners tackle repairs, choose the right tools, and build spaces they love without breaking the bank.
Published October 17, 2026
Updated October 17, 2026
Nothing ruins a backyard fire faster than playing musical chairs to dodge the smoke. A “smokeless” fire pit will not be 100 percent smoke-free (wet wood will still complain), but with a double-wall insert and the right airflow, you can get a cleaner burn that feels like cheating. The best part is you can build it with basic masonry tools, pavers, and a steel insert in a weekend.
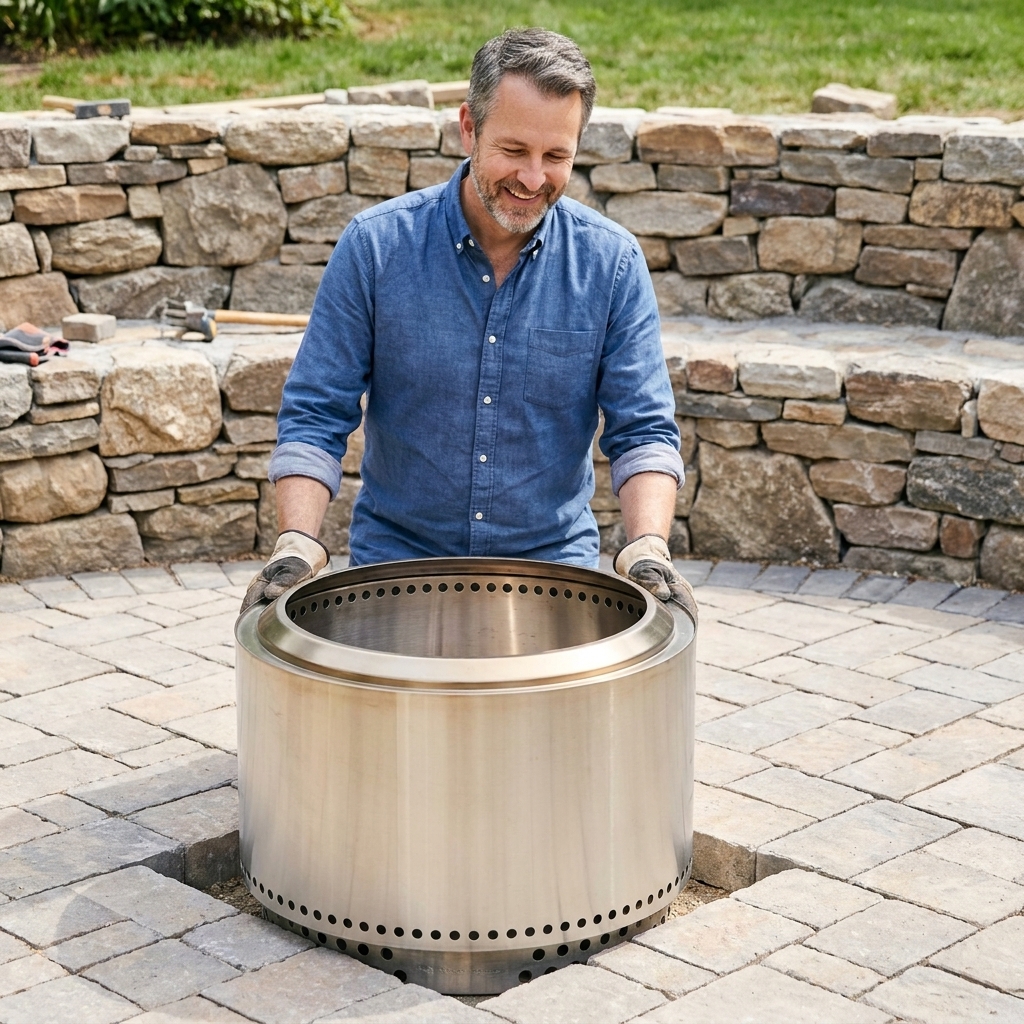
This guide walks you through a stone-and-paver surround with a smokeless steel insert. It looks built-in, burns hotter, and is easier to live with than a simple ring of blocks.
How it works
Many traditional fire pits are basically a ring of blocks on the ground. They can work fine, but when airflow is limited (no grate, damp fuel, low heat, or a pit that is partially buried), wood tends to smolder instead of burn clean. Smokeless inserts reduce that with two tricks:
- Bottom airflow: Air feeds the fire from below through a grate or lower openings.
- Secondary burn: Air is heated in the double wall and exits through holes near the top, reburning a lot of the smoke before it leaves the pit.
Your job is to build a stable, non-combustible surround that keeps the insert level, allows it to breathe, and keeps heat away from anything flammable.
Before you start
Fire rules vary wildly, even between neighbors who share a fence. Before you buy materials, check your city or county rules and any HOA guidelines for outdoor burning. If your smokeless insert has required clearances, use the stricter of local code and the manufacturer’s instructions.
Pick a safe spot
- Clear overhead: No tree limbs, pergolas, or string lights above the pit.
- Distance from structures: A common rule of thumb is 15 to 25 feet from houses, sheds, fences, and anything stored under decks, but some areas allow less and some require more. Follow the stricter rule.
- Non-combustible zone: Plan for a paver or gravel apron around the pit (at least 2 to 3 feet) to catch embers. Avoid mulch, dry leaves, and other easy fuel.
- Surface awareness: Keep open flames off wood or composite decking unless your setup is specifically rated for it. Be cautious on concrete too: rapid, concentrated heat can cause some concrete to crack or spall.
- Wind awareness: Avoid building right where wind tunnels between structures. Smokeless pits help, but wind still wins arguments.
Keep this nearby
- A garden hose connected and ready or a full bucket of water
- A small shovel
- Heat-resistant gloves
- A metal ash bucket with a lid for next-day ash removal
Materials and tools
Materials
- Smokeless steel insert (stainless or coated steel), sized for your space
- Concrete landscape blocks or pavers for the surround (fire pit blocks work great)
- Paver base (crushed stone) and leveling sand if building a paver pad
- Adhesive rated for fire features (optional, for capstones)
- Pea gravel or lava rock (optional, to dress the gap around the insert if your design leaves one)
Skip regular mortar inside the fire zone. Standard mortar can crack and spall with repeated high heat. If your design needs mortar or bedding near heat, use a product rated for fire features and follow the manufacturer’s directions.
About adhesive: Many common landscape adhesives are not rated for sustained high temperatures. If you use adhesive, verify the temperature rating and apply it on the outer cap area away from direct flame and the insert’s hottest zones, following your block and insert guidance.
Tools
- Tape measure and marking paint
- Long level (2 to 4 feet)
- Hand tamper (or a plate compactor if you have one)
- Rubber mallet
- Shovel and rake
- Masonry chisel and hammer, or an angle grinder with a masonry blade (use eye and dust protection)
- Broom
- Caulk gun (if using adhesive)
Step 1: Mark the layout
Start with the insert and build around it, not the other way around.
- Measure the insert’s outside diameter and note any manufacturer clearance recommendations.
- Choose your surround thickness. Most block systems are 8 to 12 inches thick. Thicker looks more substantial and gives you a wider perch for feet and marshmallow sticks.
- Mark two circles: the inside circle (insert footprint plus any required breathing gap) and the outside circle (overall pit size).
Pro tip: A scrap of string, a stake, and a can of marking paint make a perfect DIY compass.
Step 2: Build the base
This is where most DIY fire pits go wrong. If the base settles or tilts, your stone ring separates and your insert will not sit right.
Option A: Paver pad
- Excavate the pad area 6 to 8 inches deep (more in frost-prone regions).
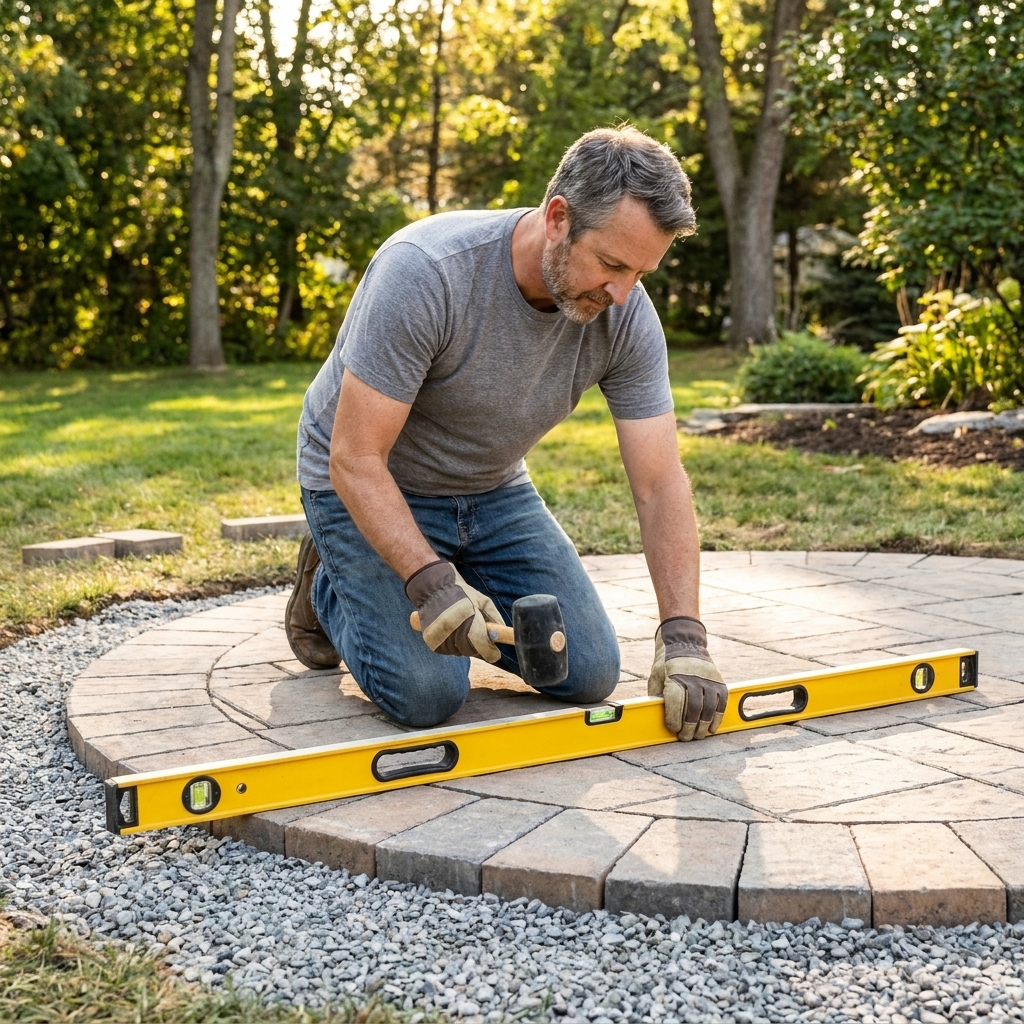
- Add crushed stone in 2 to 3 inch lifts and compact each lift. Aim for 4 to 6 inches compacted.
- Add about 1 inch of leveling sand, screed it flat, then lightly tamp or settle it per your paver manufacturer’s instructions.
- Lay pavers in a simple pattern and tap them level with a rubber mallet.
- Sweep sand into the joints.
Drainage note: If you are building a larger pad or patio area, plan drainage so water does not pool around the base. In soft soils, a layer of geotextile fabric under the crushed stone can help keep the base from sinking and mixing with soil over time.
Option B: Gravel pad
If you are putting the fire pit in a dedicated gravel area, you can skip pavers and use compacted crushed stone topped with decorative gravel. Just make sure the insert and stone ring are on a firm, level surface, not loose pea gravel alone.
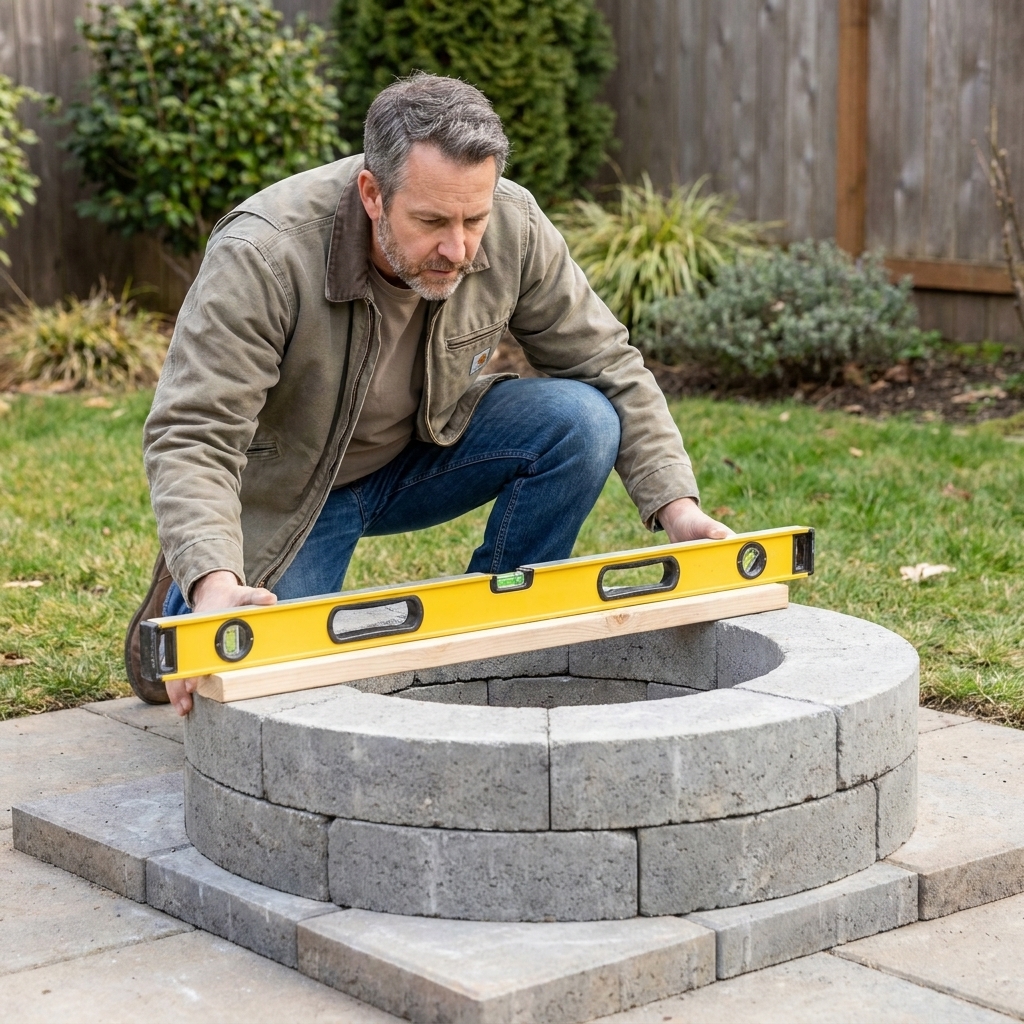
Level check: Check level in multiple directions. A pit can be level-ish and still look crooked from the patio. Take the extra 10 minutes now. Future you will approve.
Step 3: Dry-fit the first course
Never glue or stack high until your first course fits like it means it.
- Set the first ring of blocks on the base in a full circle.
- Adjust for roundness by nudging blocks in or out so joints are consistent.
- Level each block front-to-back and side-to-side. Use sand to shim low spots.
Why this matters: Every course above follows the first one. If the first course is wavy, the finished pit will look like it had a long night.
Step 4: Plan airflow
A smokeless insert needs room to breathe and expand with heat. Read your insert instructions first. These guidelines work for many common designs, but the manual wins:
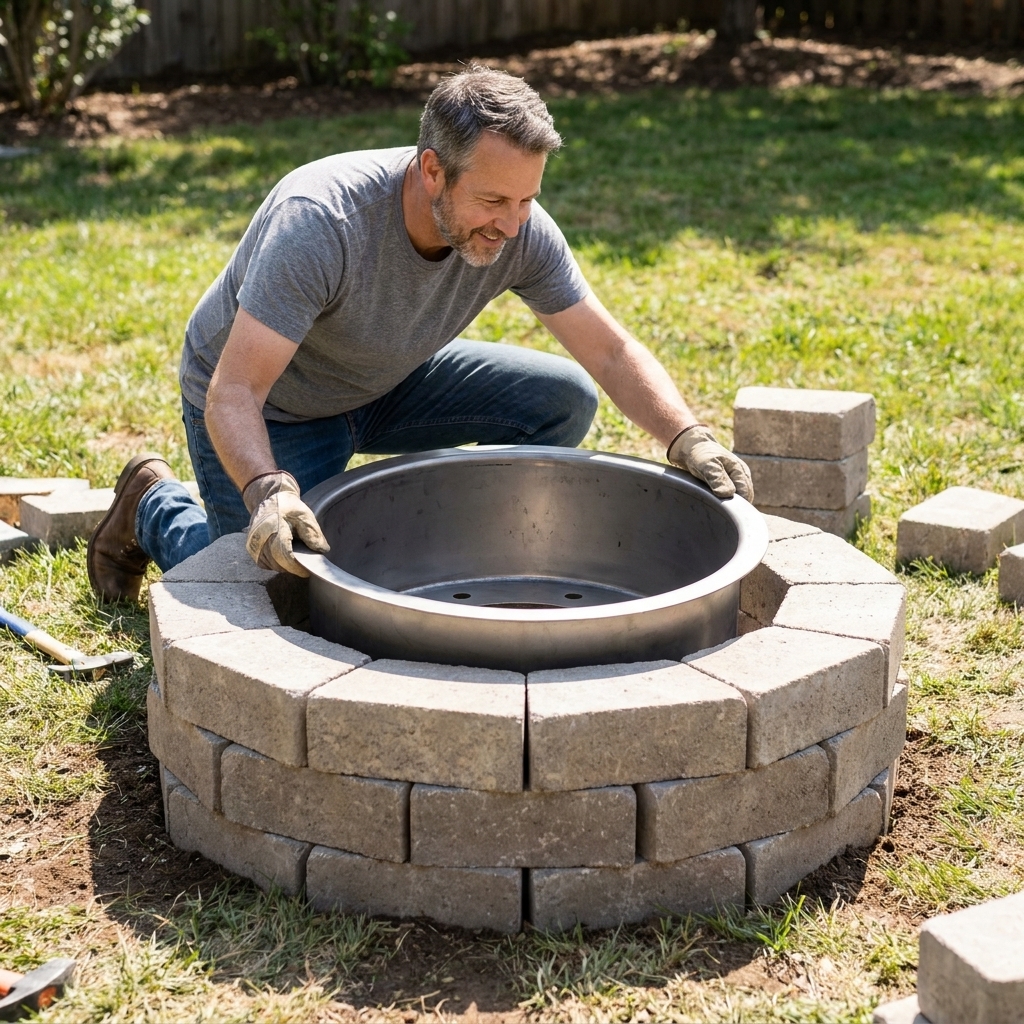
- Do not bury the insert in sand or gravel. The lower intake needs open air.
- Leave a gap only if required. Many inserts call for a small gap (often 1/2 to 1 inch) between the insert and the surround, but some are designed to nest in a specific way. Follow the insert specs.
- Support matters: Many inserts are designed to sit on a flat surface or on a ledge. If your insert has a bottom ring or flange, plan the block height so the insert sits securely without rocking.
Two support options
- Insert sits on the base: You build the stone ring around it, leaving any recommended gap.
- Insert sits on a block ledge: You create a ledge with an inner ring of fire-rated bricks or blocks. Only do this if your insert is designed for it and you can keep intakes unobstructed.
Step 5: Stack the surround
Once the first course is truly level, stacking goes quickly.
- Stagger joints like brickwork. This adds strength and looks cleaner.
- Dry-stack most courses unless your block system specifies otherwise.
- Check level and plumb every course. Small adjustments early prevent big headaches later.
- Test-fit the insert as you go, if needed, to confirm clearances and height.
If you want a capstone top, save adhesive for the final step.
Step 6: Add capstones
Capstones make the pit look finished and give you a more comfortable edge.
- Dry-fit capstones all the way around first. Plan cuts so the smallest pieces land in the least noticeable spot.
- Cut as needed with a masonry blade. Wear eye protection and a proper dust mask or respirator.
- Adhere caps with an exterior adhesive that is specifically rated for fire features and outdoor use, and place it where it will not be exposed to direct flame.
Dad tip: A slight overhang to the outside can create a nice shadow line. Avoid cantilevering capstones into the fire opening, and do not overhang the inner edge so far that it traps heat, crowds the insert, or interferes with airflow.
Step 7: Finish the area
A smokeless fire pit still throws sparks. Give it a safe landing zone.
- Pavers: Great for seating areas and rolling a cooler around without a workout.
- Gravel: Budget-friendly and drainage-friendly.
- Seating: Keep chairs back a bit farther than you think. These pits burn hotter, and your shins will notice.
- Optional: If your insert manufacturer recommends a spark screen, use one, especially in breezy conditions.
First burn checklist
Take it easy on the first fire. You are verifying airflow and letting everything settle.
- Burn dry hardwood and aim for 20 percent moisture or less. A cheap moisture meter takes the guesswork out. (Time seasoning varies by species, split size, and climate.)
- Use smaller splits to get the pit up to temperature faster.
- Do not overload. Keep flames below the top rim of the insert.
- Watch the airflow. If smoke rolls out heavily even with dry wood, you may be choking airflow at the bottom.
Common mistakes
- Building on soil or grass: It will settle and tilt. Start with a compacted base.
- Blocking the insert’s air intakes: Keep gravel, sand, and adhesive away from vents.
- Using the wrong materials near heat: Avoid decorative rocks like river rock inside the fire area. They can crack or spall and throw fragments when rapidly heated, especially if moisture is trapped. Use manufacturer-approved media only.
- Assuming “smokeless” means “anything goes”: Trash, cardboard, and treated wood still create nasty smoke and fumes. Burn clean, dry firewood only.
- Putting it too close to a fence: Heat is sneaky. Give the pit room and follow the stricter of code and manufacturer guidance.
Maintenance
Smokeless inserts are pretty low-drama if you treat them right.
- Empty ash after it cools fully, ideally the next day. Ash holds moisture and speeds corrosion.
- Ash safety: Even “cold” ash can hide hot embers. Put ash in a metal container with a lid and store it outside, away from structures, for 24 to 48 hours before disposal.
- Cover the insert when not in use, especially in rainy seasons.
- Check fasteners and seams (if your insert has them) once or twice a season.
- Re-level if needed after a freeze-thaw season. Minor settling is normal if your base was thin.
FAQ
Is a DIY smokeless fire pit actually smokeless?
It is more accurate to call it low-smoke. With dry wood and good airflow, smoke drops dramatically once the secondary burn kicks in.
Do I need a steel insert?
You can build a very efficient, low-smoke fire pit with smart airflow design, but the secondary burn effect is much harder to achieve reliably without a double-wall metal insert designed for it.
Can I use regular retaining wall blocks?
Often yes for the surround, as long as they are concrete and intended for landscape use. Keep direct flame and coals inside the steel insert, not against the blocks. Avoid blocks with unknown coatings or decorative finishes on the inside edge near heat.
How big should I build it?
For most backyards, a 19 to 27 inch insert hits the sweet spot. Bigger pits burn more wood and radiate more heat, which sounds great until you realize you are feeding it like a teenager after practice.
What is the safest base?
A compacted crushed-stone base with pavers is hard to beat. It is stable, drains well, and stays non-combustible.
Wrap-up
If you build the base flat, respect the insert’s airflow, and burn truly dry wood, a DIY smokeless fire pit feels like an upgrade you will use constantly. It is one of those projects that looks contractor fancy but is really just careful layout, patience with level checks, and letting the insert do the clever part.
When you are ready for the next step, add a paver patio ring, some simple gravel edging, and a place to stash wood that stays off the ground. Your future fires will thank you, and your neighbors might stop side-eyeing your smoke signals.